


A sturdy drawing folder is a must to store a variety of drawings. A unique hip drawing folder also belongs to an artistic person. In the store you will mainly find boring and dark designs. Creating a drawing folder is easy and not expensive at all.
Size is an important factor when creating a drawing folder. A folder that is too large is inconvenient to carry, a folder that is too small limits the dimensions of the drawings to be stored. This work description uses an A2 format. When choosing a different format, the dimensions of the materials used must be recalculated.
A list of supplies
- Ruler;
- Scissors;
- Pencil;
- 2 pieces of gray board, A2 format, 2.5 mm thick or more. This is a thick compressed type of paper resembling thick cardboard;
- Bookbinding glue;
- Thick paintbrush or plastic roller;
- Bookbinding linen, which can be bought on a roll or pre-cut. if pre-cut, 2 pieces of 100 mm X 600 mm and 4 pieces of 100 mm X 100 mm are required;
- 2 A2 drawing sheets, color of your choice;
- 1 A1 drawing sheet or larger;
- 1 roll of transparent self-adhesive cover plastic, minimum size 425 mm X 1200 mm;
- 1 roll of transparent adhesive tape;
- 1 wet rag.
Making the drawing
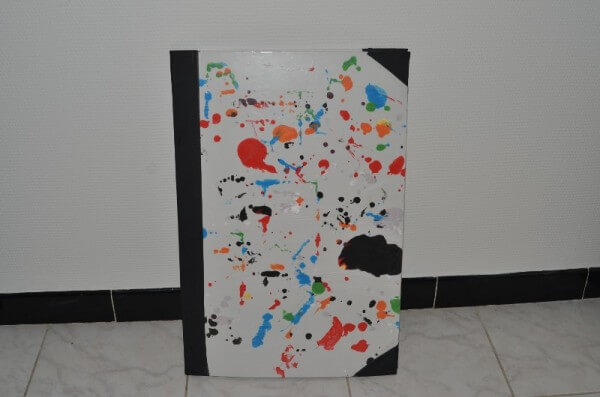
To make the outside of the folder attractive, it is provided with a drawing. This requires the large drawing sheet. The content of the drawing can be chosen by yourself. Some techniques that can be used are:
- To draw;
- To paint;
- Marble technique;
In this example, we used leftover poster paint that randomly ended up on a large sheet of paper. Afterwards, a mirror print was made by folding the leaf. The drawings must be completely dry before they are glued to the folder.
The map
Take the 2 pieces of gray board and fit the drawing on the folder halves. Cut the drawing in 2 if necessary, this is easier to glue on the gray board. If the drawing is larger than the dimensions of the greyboard, provide an extra edge of 2 cm. At the edge that extends beyond the gray board, a square corner of 2 cm should be cut out at each corner.
Take the bookbinder’s glue and brush the back of the page with the brush or use the roller to roll the glue open. Working with the roller is faster, a smoother effect is achieved. Prepare a piece of gray board, then take the glued-in drawing at 2 corners. Keep the top in height and lower the bottom 2 corners on the corners of the gray board. Lower the rest of the blade in a smooth, rolling motion. If a second person is available, he can hold the corners of the paper while the sheet is stroked step by step during the lowering of the paper. If the sheet was larger than the gray board, fold the excess paper to the back and glue it there. Follow the same procedure for the second drawing on the other piece of gray board. With the wet cloth, excess glue can be removed from the work surface.
Turn the 2 parts over and take 1 of the A2 paper sheets. Stick this in the same way as the drawing on the back of the gray board. Repeat this for the 2nd half.
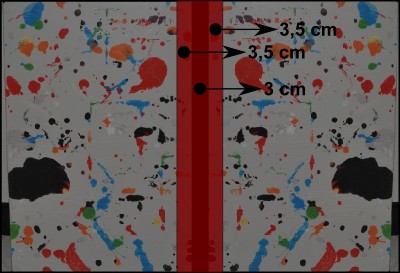
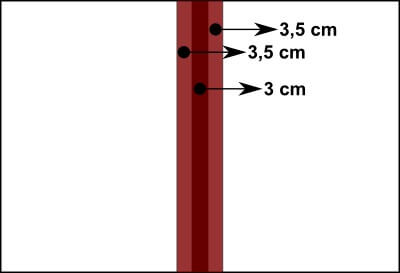
Take the 2 pieces of gray board and measure 3.5 centimeters from the edge of each piece and draw a pencil line on both the signified and the non signified side.

Place both gray board parts with the drawing upwards and make sure that there is 3 centimeters between the 2 halves. Take the bookbinding linen and cut 2 strips of 100mm X 594mm. Cover the first strip of linen with glue. Stick the linen on both parts of the folder along the pencil line
Turn the folder over, glue the 2nd strip in the same way.
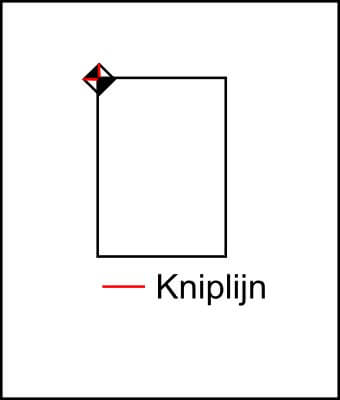
To protect the corners of the folder, they are also finished with bookbinding linen. To do this, take the 4 pieces of bookbinding linen and glue 1 in. Then cut out 2 triangles as indicated on the diagram. Fold the remaining flap to the inside of the folder. Repeat this operation for the remaining 3 corners.
Let the folder dry out well, this will take 1 to 2 days. Take the transparent adhesive film and place it on the folder. cut out the parts of the cover that are in bookbinding linen and stick the foil on the drawing. Finish the edges by covering them all around with transparent adhesive tape.
Various techniques can be used to close the folder properly. This can be done by making holes in the cover and finishing it with ribbon. The folder can then be assigned. Another way is to stick pieces of Velcro on the inside or outside of the folder.
Some paper sizes for your information
Each paper size is the previous size divided by 2. So 2 A2 sheets can be made from an A1.
- A1 841mm X 594mm;
- A2 594mm X 420mm;
- A3 420mm X 297mm;
- A4 297mm X 210mm.

