


Which order do you prefer to stick to when painting windows, doors and frames? A painter almost always works in a certain order when he or she paints windows, doors, frames, fascias or walls. It is advisable to follow a fixed sequence when painting for a sleek and professional result. A fixed sequence when painting is important to prevent start-ups in the paintwork and to promote the smooth flowing of the paint. Adhering to a fixed, systematic order of work also reduces the chance of holy days. Holy days are places where no or insufficient paint is applied. Follow the most usual order when painting as much as possible for a nice flow of the paint and good coverage and optimal protection of the woodwork.
- What are the starters in the paint
- Order when painting doors
- Sequence when painting window frames
- Sequence when painting windows
What are the starters in the paint
Starts occur where you first place the brush or roller on your work and if you brush or roll with the brush or roller in an already dried layer of paint. When you apply paint, the paint will immediately start to dry under the influence of oxygen; the so-called oxidative drying. If you have painted a horizontal part first and this (partly) overlaps with a fresh layer of paint on a vertical part, the greatest chance of incrustations will arise at the point where the two layers of paint overlap. Because the paint you put on the horizontal part has already dried on a bit, the paint will flow less well as soon as you brush the vertical part over it.
Importance of the sequence when painting
It is almost impossible to finish all individual parts of a window, frame or door to the nearest millimeter and tightly. However, by highlighting the various, separate horizontal and vertical parts as tightly as possible, and working in a fixed sequence, you avoid the risk of starting as much as possible. In addition, you will not forget to paint something so quickly if you follow a fixed sequence of works. Of course it is also important to use high-quality materials (paint) and tools (brushes, etc.) to facilitate painting and improve the result.
Flat on painting
With ‘flat on’ in the description the flat parts are meant, without deeper lying parts, edges and edges.
In general, when painting the individual parts (horizontal or vertical), try to paint on another part as little as possible. This is to prevent the aforementioned onset. This is a golden rule for all surfaces to be painted. Always work the parts in full paint, distribute the paint well and finally iron, avoiding “holy days”.
Inside or outside of the home when painting
The end face that you look at at doors and windows when opened determine whether the paintwork belongs to the inside or the outside. So: the short side of the outward opening windows and doors belong to the outside of the house; the hinge side to the inside. Of course, the reverse applies to windows and doors that open inwards.
Order when painting doors
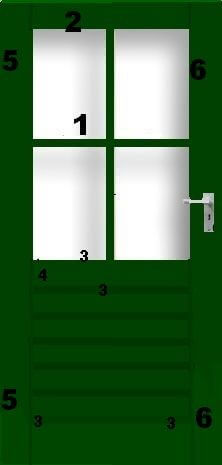 Click on the image for more detail
- Start with the cross bars, where you -per style- first paint the sides towards the glass and then flat.
- The top horizontal style. Here you first paint the top edge of the door to protect it from conspicuous moisture where the exterior doors are concerned. It is especially nicer for interior doors if there is a chance that it is visible from above (staircase).
- Then the parts that connect to the glass and finally “flat on”. When painting the top edge of the door, watch out for dripping on the other side of the door.
- Within the bottom panel you start with the deeper parts. Distribute the paint from the center to the top and bottom, this way you distribute the paint well and evenly and you don’t run the risk of the paint collecting in the outer corners and dripping.
- Paint the horizontal parts of the panel; first the top one towards the glass and then the rest flat. Do not forget the bottom of the door, so that you protect it with sufficient paint against rising moisture (outer door)
- The hinge side of the door. Again first paint the edges towards the glass and then the entire style flat.
- Start with the end of the door. This is the edge that you look at when the door is open. Then you paint the edges towards the glass and around the lock plate and the other door fittings. As a final finish you paint the style ‘flat’.
Sequence when painting window frames
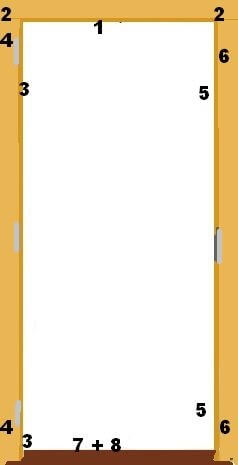 Click on the image for more detail
- 1. The start is the bottom of the top beam, after which you finish the beam ‘flat on’ = 2.
- 3 and 4. You finish the inside of the frame in the order as with the top beam. First the hinge side and then
- 5 and 6. The closing side; this will then have less chance to dry up. When entering and leaving a room, this is the style you first look at. So the tighter this style is, the better the overall experience will be.
- 7 and 8. If applicable, you paint the threshold or sill last next to a frame, because this is the most vulnerable part with walking and possibly noticeable dust. In the home, this will often be a threshold and falls outside the frame to be painted.
Sequence when painting windows
(the way of painting is very similar to painting the doors)
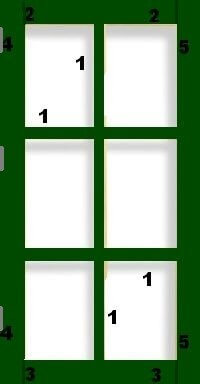 Click on the image for more detail
- Start with the cross bars, where you -per style- first paint the sides towards the glass and then flat.
- The top horizontal style. First paint the top edge of the window to protect it from moisture. Then the parts that connect to the glass and finally flat on. When painting the top edge of the window, watch out for drippings at the back of the window.
- The bottom horizontal style. Keep to the same order as described under point 2, except that the bottom edge of the window is to protect the wood against moisture.
- The hinge side of the window. Again, first paint the edges towards the glass and then the entire vertical post flat.
- The lock side of the window. Also start here with the short side of the window. This is the edge that you look at with an open window. Then you paint the edges towards the glass and finally flat again.

