


The spark plug is part of the ignition system of a fuel engine. The spark plug gives off an electric spark which in turn ignites the fuel-air mixture in the cylinder in a controlled manner to generate driving power. A spark plug wears out and once in a while they have to be replaced, a job that you can easily do yourself. Fun to do and it saves a little on car costs. Spark plugs are checked on average every thirty thousand kilometers, but if you notice that the engine does not run as smoothly or responds less smoothly to the accelerator, it does not hurt to look at the spark plugs.
The preparation
Spark plugs are best replaced when the engine is cold, as soon as the engine is hot, metal expands and the spark plugs are too tight. Moreover, it does not work very well with the heat close to your hands. To be able to reach the spark plugs, it is useful to make some more work space, this can be done by removing the reservoir for the windscreen washers and the air filter box. The battery can also be removed, only the nuts of the battery bracket sometimes get rusted and break off when loosened. Due to the position of the spark plugs on the side ?? of the engine, using a traditional spark plug wrench is not really convenient. The handle is just a bit too short and the space between valve cover and chassis gives little room to apply force.
Tools
- Big rattle
- Extension piece
- Spark plug cap; Looks like a regular long cap but has a rubber ring inside that clamps around the spark plug.
- Steel pipe or something similar.
- Combination wrenches or ring wrenches in various sizes
Condition of the spark plugs
Used spark plugs are dirty, but the degree of contamination will give you useful information about the condition of the engine and whether it is better to use a different type of spark plug.
 normal / Source: Manual Legacy 1994 NV Subaru Benelux
 carbon deposits / Source: Manual Legacy 1994 NV Subaru Benelux
 oil deposit / Source: Manual Legacy 1994 NV Subaru Benelux
 Overheating / Source: Manual Legacy 1994 NV Subaru Benelux
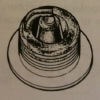
Normal
A spark plug with a brown to greyish coating and slight wear on the electrode indicates that the spark plug has the correct heat level and is being used normally. As long as the tip has not yet worn spherically, it is not necessary to replace it. Removing the deposit with a fine wire brush is sufficient to re-use the spark plug.
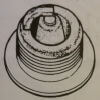
Carbon deposits
Often driving in town at low speeds, poor ignition, fuel mixture that is too rich or a dirty air filter cause a dry dust-like deposit on the spark plug. In a lot of city traffic it is advisable to use spark plugs with a higher heat level.
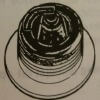
Oil deposit
Wet black deposits are the result of too much oil supply to the combustion chamber. Possible causes for this are worn piston rings and pistons or too much play between the valve guides and valve stems. If you don’t see an improvement after repair, use spark plugs with a higher heat level.
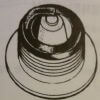
Overheating
If the insulator has a white or light gray color with black or gray-brown spots and bluish burnt-on electrodes, this is a sign of overheating. It could also be incorrect ignition adjustment or the spark plugs could be loose. A wrong choice of fuel or a spark plug that is too hot can also cause this condition of the spark plug. It is then advisable to use spark plugs with a lower heat level.
Disassemble
Reservoir & air filter
Be the first to disconnect the ground cable (pole) of the battery when servicing the car, this will prevent possible short circuits during work on the engine block and personal injury. To create workspace, the air filter box and reservoir are removed from the windscreen washer. There are two bolts at the top of the reservoir, loosen these. Slowly pull up the reservoir, unplug the pump and pull the hose off the nipple on the pump. If the car also has a rear wiper and / or headlight washers, remove the plugs and hoses from these pumps. Some liquid will run out, place the reservoir with the pumps as far up as possible or close the nipples. The two halves of the air filter box are secured with clamps, click all four open. The top half is attached to the suction tube with four bolts, loosen the bolts and catch the two brackets with welded nuts on the inside. Set the top half of the air filter box aside and remove the panel filter. The underside is attached to the chassis with two bolts, loosen these and pull the box up from that side. The other side is slid over a piece of tube that disappears under the mudguard, with some pressure the filter box shoots loose from this tube. Also put the bottom half of the tray aside.
Release spark plugs
Remove the spark plug wire from the spark plug, pulling on the cap over the spark plug and not on the wire itself. If the car has a coil on plug (each spark plug a separate ignition coil) instead of spark plug wires, loosen the ignition coil bolt and pull the entire ignition coil off the spark plug. If this is difficult due to a chassis bar getting in the way, disconnect the ignition coil connector and rotate the ignition coil until you get enough slack to remove it.
Put the ratchet extension on the spark plug cap and place it together over the spark plug, doing this by hand so you can feel the cap clamp around the spark plug. Now place the ratchet on the extension and unscrew the spark plug counterclockwise. If this does not work with some force, extend the handle of the ratchet with a steel pipe or similar (the longer the arm, the greater the force applied). Once released, you can check the condition of the spark plug and whether or not it can still be used.
Assemble
Tighten spark plugs
Press the spark plug into the spark plug cap with extension and insert it by hand into the cylinder head. Turn the spark plug carefully clockwise to avoid damaging the threads, this should be effortless. As soon as you have to apply force in the beginning, the spark plug is crooked, stop immediately and try again. As soon as manual tightening does not want to continue, tighten the spark plug the last bit with the ratchet, do not use an extension pipe and do not apply too much force, it is tight.
Reservoir & air filter
Hold the reservoir over where it belongs and connect hoses and plugs. There is a protrusion at the bottom of the reservoir that falls into a recess in the chassis. Push the reservoir on and tighten the two bolts. The lower part of the air filter box is first slid over the tube at the fender and secured. Then tighten the two bolts in the chassis to secure the tray. The top half is attached to the suction tube with four bolts, make sure the rubber ring remains in the right place for a good seal. Place the panel filter and close the container with the four clamps. Carefully check all connections under the suction pipe, sometimes a hose will come loose, with the result that the engine will either not start or run very poorly. Reconnect the battery earth cable (pole) and take a test drive.
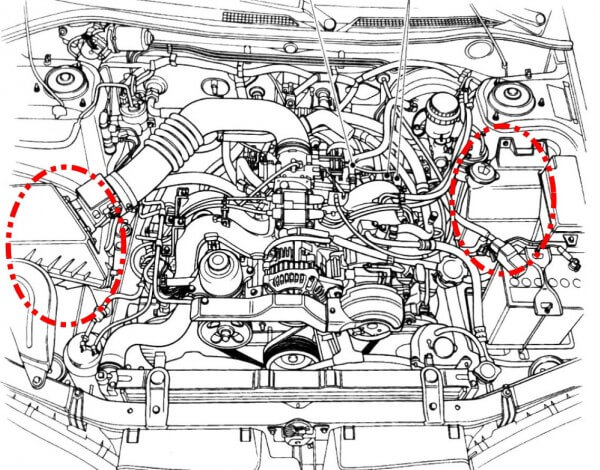 filter tray & tank / Source: Manual Legacy 1994 NV Subaru Benelux
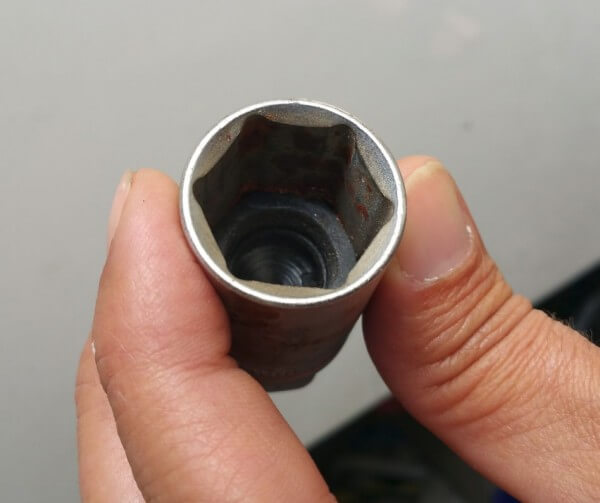 spark plug cap
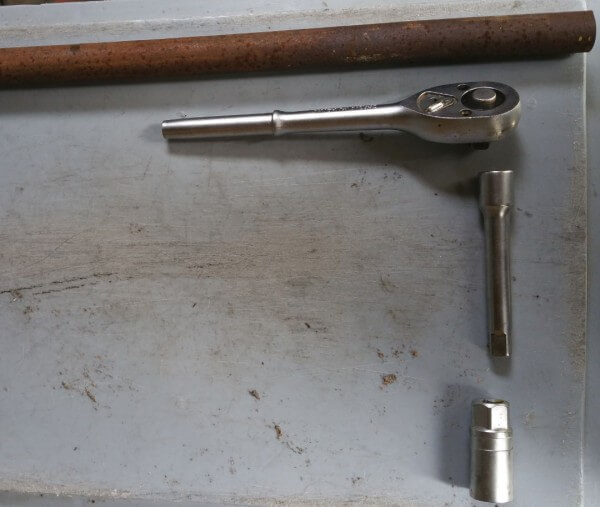 rattle

